Monday, October 1, 2012

Behind the scenes- The Four Seasons

This week I decided to paint four 5x7-inch watercolors to depict the four seasons. 

When I do art shows I have a few framed sets of four giclées that I offer, and people always ask me if I have one that has all four seasons in it. I'm very happy to say that I no longer have to tell them, "I'm sorry, but no." 

I decided to do the same landscape in each painting, but to make it appear to have been done from slightly different distances and angles, as if they were done at four different times. Today I'm not going to show you step-by-step painting steps for my watercolors, but I'm going to share with you some of the planning that went into these paintings. 


I started with this little value sketch that I did in Glen Ayre, NC last year. 


From this sketch I created four new value drawings depicting what the four seasons might look like in this location. These were to be used as plans for the four completed paintings, and were done slightly smaller than the completed paintings.


I also made a plan for the colors I would use in each scene.


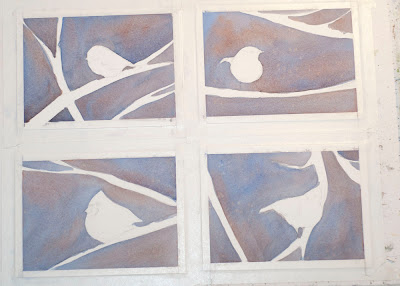
I decided to make each painting 5x7 inches. I taped town four pieces of paper and drew in the outline of each scene. Two of them are upside down in the photo because I wanted to be able to work on each of them without leaning over the others.


And here are the completed paintings! I used American Journey paints from Cheap Joe's Art Stuff for the most part, as well as transparent oxide red and quinacridone gold from Daniel Smith.


Winter

Spring

Summer


Autumn


I will also make giclée prints of these paintings and offer them as framed sets in a vertical format. I hope you enjoyed seeing a little bit of the planning that went into my "Seasons" paintings! 

Once you leave your comments below please Like my Page on Facebook!!

You can also see more artwork on my website at www.LauraPoss.com 

Wednesday, May 23, 2012

Four Little Birds- A Commissioned Project

Near the end of last year I painted four little winter bird watercolor paintings that were each 8 x 10 inches. I made giclée reproductions of my little bird paintings and began offering them in a few different sizes.
In the smallest sized giclee, which is 3 ½ x 5 inches, I started framing and selling the four little birds together as a vertical set. The four birds look really nice in the small size, and all grouped together.
watercolor bird paintings
Clockwise from top left they are a Carolina Chickadee, Carolina Wren, Tufted Titmouse, and Northern Cardinal.
  Then, at an art show last April, I had a customer come in to my booth who wanted the original bird paintings, but he wanted them in the small size and he wanted them framed together like the set of giclées. So he commissioned me to paint four original watercolors, based on my own 8x10-inch paintings, but only 3½ x 5 inches each. Of course, I agreed! And I took photos of the process and will now share them with you..


watercolor bird paintings
First I trimmed my watercolor paper to the correct sizes, and then taped them all to my gatorboard. I penciled in the bird shapes and the main branches, then started with loose washes of transparent oxide red (Daniel Smith) and cobalt blue (American Journey) to create the soft background.


watercolor bird paintings
 I continued laying in washes of the same colors in the background, and sprinkled some salt into the wet paint here and there to create texture and the appearance of background snowflakes. I chose to do the background in multiple layers to create depth with the overlapping shades. Once I was satisfied with the background washes, I used a fritch scrubber brush to lift out the shapes of the lighter background branches and  foreground snowflakes. I also laid in the first appearance of color on the bodies of the birds and foreground branches.


watercolor bird paintings
I continued painting the colors of the birds and foreground branches, using the same technique of layering washes, letting each wash dry in between. (A hairdryer helps to speed this along.)And here you can see the four watercolor paintings completed and signed, but still taped to the gatorboard. Note-at the end I used a white gel pen to add some of the white detail on the cardinal's wing.


Framed and ready to go!

 My husband, John made a lovely frame for the little birds, and double matted them with a black inner mat and a speckled off-white outer mat.
And now these little guys are being shipped to their new home in the state of Maine!


Thank you for reading my blog and I hope you find it helpful!

When you're done leaving your comments/questions below, please check out my facebook page, and click "Like" if you do!

Tuesday, February 7, 2012

Pro Panel skirts: A Sewing Project

Today I'm going to tell you about how I made attractive and useful "skirts" for my Pro Panels.

If you read my blog, you might remember that I bought Pro Panels for my art booth last year. (If you don't know what I'm talking about, you can read about it here.)

Pro Panels are carpet-covered display walls that can be put up and taken down easily to display various kinds of art. I use mine to hang my framed watercolor artwork at arts & craft shows. The Pro Panels have adjustable legs to hold them up off the ground. When the legs are extended, you can see underneath my panels and into the next artist's booth, or into any storage areas that I may have. I wanted an attractive way to solve this problem, so I decided to make removable skirts that would attach to the bottoms of my panels and hide whatever was on the other side. Pro Panels does sell a type of removable covering on their website, by the way, but their covers are very plain, and I wanted something better-looking.

I purchased some pretty upholstery fabric online, designed a pattern, and set to work. I chose upholstery fabric because it looks more upscale, and the heaviness of it prevents my skirts from blowing around at outdoor shows. They retain their shape nicely wherever I go. I also decided that they would attach to the Pro Panels along the bottom by fastening them to the back of the panels with Velcro. This meant that they would need to be tall enough to overlap the back of the panels. My panels are 38 1/2 inches wide, and I usually set the legs about a foot or so from the ground. After a little bit of trial and error, I also decided that they needed to be a little bit wider than the width of the panels, to ensure good coverage. My completed skirts measure 14 1/2" tall and 40" wide.

So... I cut large rectangles out of my fabric (18 1/2" x 43 1/2"), and hemmed them as shown.

First I hemmed the sides.


Then I hemmed the top and bottom.
I made the hem the largest on the bottom (2") to make it look nice and professional.


For each hem, it is necessary to first measure, then pin, then iron in a crease. Then do the second fold. Pin it and iron it. Then sew a straight stitch all the way from one end to the other. If you are using upholstery fabric, like I am, don't forget to buy upholstery or heavy-duty thread! Once you have hemmed all four sides of your skirt, sew the velcro all the way across the top of the skirt. I sewed mine to the front of the skirts so that I could attach them to the back of the Pro Panels.


Three sides done.. measuring for the bottom hem.


Finished skirts!


Thanks so much for reading my blog and I hope you found my instructions helpful! I would love to read your comments, and would be glad to answer any questions.

My watercolor art site: www.lauraposs.com

When you're finished leaving your comments below, head over to Facebook to like my page for all the latest news!


Laura D Poss watercolorsMy new skirts in action! :D