Showing posts with label watercolor painting. Show all posts

Monday, October 1, 2018

A Watercolor Time-Lapse Video—My first!


Last week recorded my first-ever watercolor painting demo video and uploaded it onto my YouTube channel as a time-lapse video. It was fun to do and a bit exciting to see the result!

I painted this watercolor demonstration in about 30 minutes and the time-lapse video of the painting process ended up being just under 3 minutes.  The painting is a landscape of the Blue Ridge Mountains with green tree branches in the foreground. I plan to create more watercolor painting videos in the future, so I'm definitely interested in hearing what kind of demos and paintings fans of my art would like to see!

As is always the case when I try something new, I learned a lot from my first watercolor demo video. For instance, the work is far from over when you're finished recording the video. I gained a lot of new video-editing skills as I learned to adjust cropping, lighting, and colors in Photoshop CS6 (luckily it's very much the same as editing photos, once you learn the ins and outs of working with videos in Photoshop), as well as how to create and join other video clips and images together. It was so much fun and I can't wait to do more with my new abilities!

So after you watch the video below, please leave your thoughts in the comments. Let me know how I'm doing so far and what you'd like to see in the future!


Monday, October 1, 2012

Behind the scenes- The Four Seasons

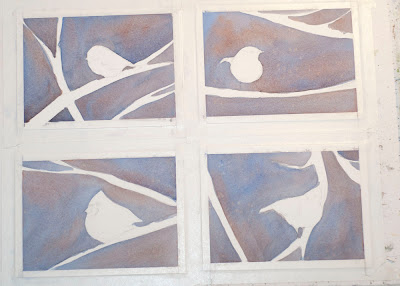
This week I decided to paint four 5x7-inch watercolors to depict the four seasons. 

When I do art shows I have a few framed sets of four giclées that I offer, and people always ask me if I have one that has all four seasons in it. I'm very happy to say that I no longer have to tell them, "I'm sorry, but no." 

I decided to do the same landscape in each painting, but to make it appear to have been done from slightly different distances and angles, as if they were done at four different times. Today I'm not going to show you step-by-step painting steps for my watercolors, but I'm going to share with you some of the planning that went into these paintings. 


I started with this little value sketch that I did in Glen Ayre, NC last year. 


From this sketch I created four new value drawings depicting what the four seasons might look like in this location. These were to be used as plans for the four completed paintings, and were done slightly smaller than the completed paintings.


I also made a plan for the colors I would use in each scene.


I decided to make each painting 5x7 inches. I taped town four pieces of paper and drew in the outline of each scene. Two of them are upside down in the photo because I wanted to be able to work on each of them without leaning over the others.


And here are the completed paintings! I used American Journey paints from Cheap Joe's Art Stuff for the most part, as well as transparent oxide red and quinacridone gold from Daniel Smith.


Winter

Spring

Summer


Autumn


I will also make giclée prints of these paintings and offer them as framed sets in a vertical format. I hope you enjoyed seeing a little bit of the planning that went into my "Seasons" paintings! 

Once you leave your comments below please Like my Page on Facebook!!

You can also see more artwork on my website at www.LauraPoss.com 

Wednesday, May 23, 2012

Four Little Birds- A Commissioned Project

Near the end of last year I painted four little winter bird watercolor paintings that were each 8 x 10 inches. I made giclée reproductions of my little bird paintings and began offering them in a few different sizes.
In the smallest sized giclee, which is 3 ½ x 5 inches, I started framing and selling the four little birds together as a vertical set. The four birds look really nice in the small size, and all grouped together.
watercolor bird paintings
Clockwise from top left they are a Carolina Chickadee, Carolina Wren, Tufted Titmouse, and Northern Cardinal.
  Then, at an art show last April, I had a customer come in to my booth who wanted the original bird paintings, but he wanted them in the small size and he wanted them framed together like the set of giclées. So he commissioned me to paint four original watercolors, based on my own 8x10-inch paintings, but only 3½ x 5 inches each. Of course, I agreed! And I took photos of the process and will now share them with you..


watercolor bird paintings
First I trimmed my watercolor paper to the correct sizes, and then taped them all to my gatorboard. I penciled in the bird shapes and the main branches, then started with loose washes of transparent oxide red (Daniel Smith) and cobalt blue (American Journey) to create the soft background.


watercolor bird paintings
 I continued laying in washes of the same colors in the background, and sprinkled some salt into the wet paint here and there to create texture and the appearance of background snowflakes. I chose to do the background in multiple layers to create depth with the overlapping shades. Once I was satisfied with the background washes, I used a fritch scrubber brush to lift out the shapes of the lighter background branches and  foreground snowflakes. I also laid in the first appearance of color on the bodies of the birds and foreground branches.


watercolor bird paintings
I continued painting the colors of the birds and foreground branches, using the same technique of layering washes, letting each wash dry in between. (A hairdryer helps to speed this along.)And here you can see the four watercolor paintings completed and signed, but still taped to the gatorboard. Note-at the end I used a white gel pen to add some of the white detail on the cardinal's wing.


Framed and ready to go!

 My husband, John made a lovely frame for the little birds, and double matted them with a black inner mat and a speckled off-white outer mat.
And now these little guys are being shipped to their new home in the state of Maine!


Thank you for reading my blog and I hope you find it helpful!

When you're done leaving your comments/questions below, please check out my facebook page, and click "Like" if you do!

Tuesday, March 16, 2010

Value Studies

A value study is a great way to prepare for a new painting, and helps ensure that you will get the result you want when you paint your final painting. A value study is a sketch using only one color. Usually it will be smaller than the final painting, and done far more quickly. The advantage of a value study is that you take the focus off of the colors, and put it on placement and values.

I read about value studies many times before I tried it myself. I did one for the first time while at a workshop with Joe Miller. Now I consider it an important step in my artistic process.

I almost always do a value study of some kind for every larger painting, even if it's only with a regular pencil and shading. They're not always pretty, and are usually done very quickly. Pencil value studies, I spend maybe 2-5 minutes. If I paint it, maybe 15-20 minutes.

*Tip- If you do value studies with paint, don't choose a light color on your palette! You won't be able to create values that are very dark with a light color! My favorite choices for value studies in watercolor are ultramarine, burnt umber, sap green, and quinacradone gold.

The pics I have here are some of my favorites I've done. (And least sloppy!) I hope you enjoy them, and find them useful to get you started practicing your own value studies! :)

As always, happy painting! Leave your comments or questions below... don't be shy! I want to hear from you!

If you like, please also visit my website at www.lauraposs.com.

Got twitter? Follow me! Got facebook? Fan me!


Friday, February 12, 2010

How to stretch watercolor paper

Stretching watercolor paper keeps it from buckling while you are painting on it. It is not necessary for 300-pound paper, but lighter papers will buckle when they get wet. 300 pound paper gets expensive, so many watercolor artists buy 140- pound paper and stretch it to a hard surface.

There are lots of ways to do this. Today I'm going to share with you how I do it. I drew some little doodles in my notebook to help you see what I mean.

You need a hard backing surface to stretch the paper to. I use gatorboard (aka. gatorfoam board). Gatorboard is similar to a super-thick piece of foam board, but it has a much stronger outer surface that will hold up a lot longer than foam board. It's lightweight, easy to staple (and remove staples from), and doesn't mind getting soaked, so it's perfect for this purpose. (You can find it at various art supply stores under different names, or you can order gatorboard from Cheap Joes Art Stuff, at http://www.cheapjoes.com- my favorite place!)

Other supplies:
water, stapler and staples, masking tape or artist's tape, watercolor paper


Steps:

1. First I cut my paper to the size I need, and lay my gatorboard flat on a table or counter.

2. Next I hold the paper under cool, running water in the sink or bathtub, moving it around until it's thoroughly wet everywhere on both sides. I really let it run over it for a couple of minutes on both sides, so it gets nice and soaked. (Some artists choose to actually soak their paper in a tub of water.) After I've done this on both sides of the paper, I hold it up by one corner and let the water run off until it stops running and starts dripping. Then I hold the opposite corner up for a few seconds, so the excess water settles back onto the paper more evenly (vs. being pooled in one corner).


3. Then I lay the paper flat on top of the gatorboard and start to watch what happens. (Note- loose sheets of watercolor paper should be the same on both sides. Paper removed from a block or pad may have a front and back side.) As it buckles (ie. creates big wrinkles or waves), I tug gently on the sides to flatten it back out. If some areas (like corners) are drying to the point where they lose their sheen while other places are still very wet, I'll mist them with a spritz bottle to make them shiny again. Once most or all of the paper has absorbed the excess water and is no longer shiny, it's time to start stapling it down.

4. I start stapling the paper to the gatorboard along the outer edges of the paper. First I put a staple in the middle of one of the shorter sides of the paper. Then I turn the board around, pull on the opposite side until the paper is taut, and put a staple directly across the page from the first one. When pulling the paper tight, I tug on it just enough to see it strain against the staple. If you pull more, it will tear the staple out. Next, I repeat the process on the longer two sides of the paper, starting in the middle of one side, then pulling taut and doing the opposite staple. I do the corners next, using the same process of pulling the paper taut each time. It's a bit like stretching a canvas or even something like a drum.

If by the time I've stapled the centers of all four sides and corners, one of the first staples needs to be adjusted, I just pull it out with my fingernails, pull the page taut, and put another staple in. For a large piece of paper, I'll often do 3 staples in the middle of each side before moving onto the corners, such as in the drawing below.

Once the centers and corners are finished, I simply go around the rest of the paper edges with my stapler, placing staples about 1/2-inch apart al the way around the page. If I do them too far apart, sometimes wrinkles/buckles will pop up between staples as the paper is drying and that's frustrating.

 .


5. Next I just have to let the paper dry completely before it's ready to use. This can be sped up with a hair dryer, if desired. Don't try to draw on it until it's completely dried!

6. For a finishing touch, I tape the edges of my paper with masking or artist's tape, covering the edge of the paper and all the staples. This keeps water and paint from running under the paper while I'm painting, and also makes a nice clean edge all around my painting when I am done. When I finish painting, I simply remove the tape, pull the paper off the board, and remove the staples. (You can remove the staples first if it's easier. I have a tool that makes it easier to remove them after taking the paper off the board.)

Happy painting! Leave your comments or questions below... don't be shy! I want to hear from you!

My art: lauraposs.com

Etsy shop: lauraposs.etsy.com

Facebook: facebook.com/lposs.art


Saturday, January 9, 2010

Handprint

HANDPRINT: http://www.handprint.com/HP/WCL/water.html

If you enjoy watercolor painting, you have to check out this website. The main page claims " the world's finest guide to watercolor painting", and I cannot disagree. This site is created by Bruce MacEvoy. You can learn more about him by clicking on "FAQ" from the main page, and see his artwork by clicking "recent works" from the main page.

If you are new to the site, I suggest you hop on over there, (after you finish here, of course) and click on "intro" at the top of the list of links on the left side of the page. From there you can read a info about the site, and explore the site map.

The site map on this site is an extremely long list of all of the content within the site. You can click on anything on the list to see the page containing the information which interests you. This fabulously detailed list begins with links to a wealth of information about the tools and materials for watercolors. Paints, brushes, paper, pallattes- even including things like explanations of how the paints are made and guides to the many choices and brands available. There's also tons of instructional info like color theory and mixing, composition and design, drawing and watercolor technique, and lots more "how-to"s. Unbelieveably, that's just half of the list! They also offer an extensive directory of instructional books available, complete with full reviews, a directory of retailers for the watercolor artist, and one more incredible thing: a large online watercolor painting exhibit. Artists are chosen from the 18th century to today, and works and stories of their lives are there, on this amazing website, for you to study and enjoy.

Have fun!!

lauraposs.com